
Set up your account
To get started with baningo cards, create an account and log in.
Once you’re logged in, you can set up your own digital business card and manage the cards of your team.
Before adding all team members, we recommend setting up the basic structure and design of your digital business cards first.
For a detailed walkthrough, see How to set up a basic design for your digital business card.
Set up the basic card design
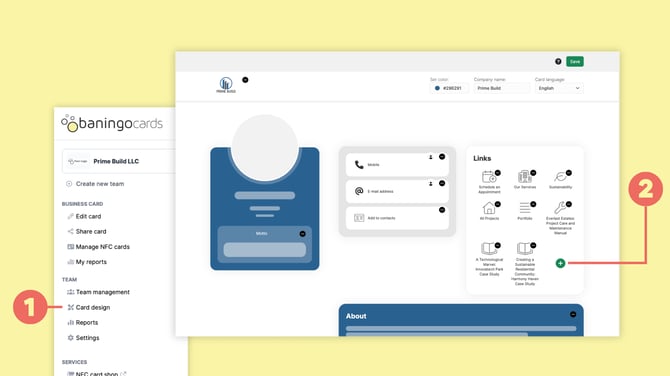
Open Card design (1) for the team you want to configure.
Card design defines the structure of the digital business cards in this team.
Use the + icon (2) to add elements such as:
- phone numbers
- email addresses
- links
- social media
- custom elements
- text fields
You can decide whether an element should contain information that is different for every person or information that is managed centrally for the whole team.
Personal information is filled in under Edit card, while Company elements are managed centrally by administrators.
Edit your own card
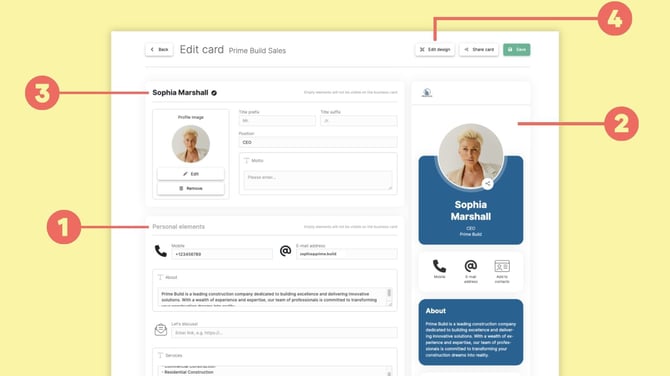
Open Edit card to manage your own digital business card.
The Personal elements (1) section contains information that is specific to your card, such as your phone number, email address or personal links.
The live preview (2) shows how your digital business card will look to others.
Under Basic information (3), you can update details such as your profile photo, name and position.
If you want to change the structure of the card or add new elements, use Edit design (4) to access Card design.
Create and manage teams
If your organization has several departments, companies, brands or other groups that require different card designs or settings, you can create additional teams.
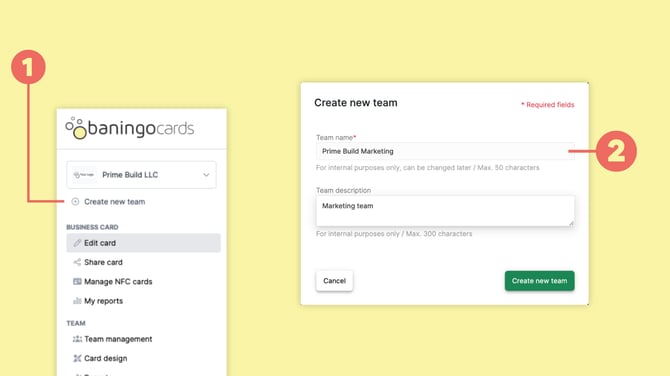
Select Create new team (1).
Enter the team name and, if needed, an internal description (2) and create the team.
Each team can have its own card design, members and settings.
Creating additional teams requires an active Business plan.
Add and manage team members
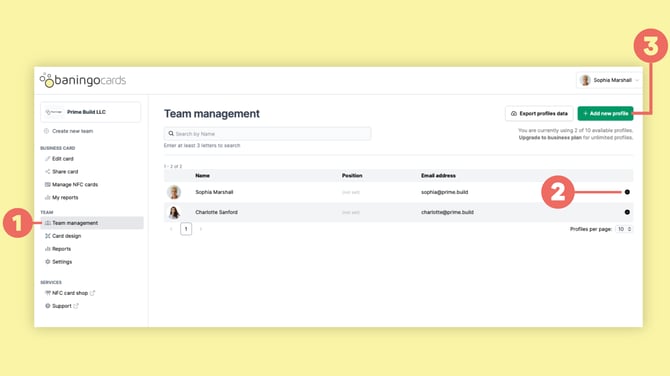
Open Team management (1) for the team you want to manage.
To add another person, click Add new profile (3).
You can either:
- create a new profile directly
- add an existing profile from another team
When you create a profile directly, you can manage the digital business card yourself.
If the person should also be able to log in to baningo, you can send them a login email so they can set their password and access their account.
For existing profiles, open the profile actions (2) to view or edit the card, send a login email, grant administrator rights or delete the profile.
For the complete workflow, see How to manage team members.
Manage settings and billing
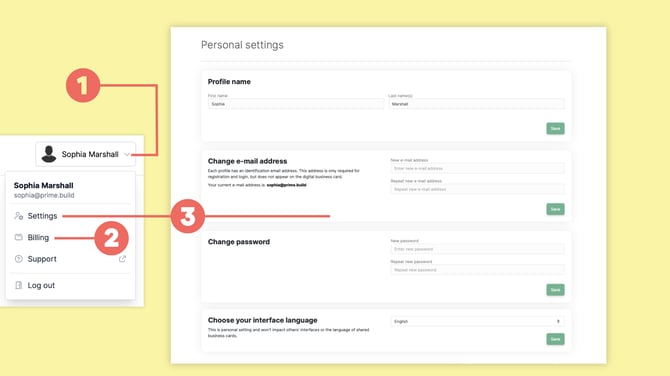
Click your profile name in the top-right corner (1).
Administrators can open Billing (2) to manage the subscription, payment methods and billing information.
Select Settings (3) to manage your personal account settings, such as your interface language, account email address and password.
Share your digital business card
Once your card is ready, open Share card.
You can share your digital business card using:
- a direct link
- a QR code
- an NFC card
- Apple Wallet or Google Wallet
For all available options, see How to share your digital business card.